A planning folder is a way to organize work into feasible chunks and monitor its
progress. As a project admin or as a user with the appropriate permissions, create and
populate all the planning folders you need to capture the work you are planning.
When you've thought through your plan, express it in one or more planning
folders.
Tip: It often makes sense to set up planning folders
after you have outlined and analyzed the features you plan to deliver.
See
Define the scope of your project.
For your agile projects, you have the option
to create planning folders specific to iterations and releases, or you can create
generic planning folders which you may customize later. When you've thought about
the general categories the work falls into, you are ready to create planning folders
that reflect those ideas.
A planning folder can represent:
- A set of tasks, such as Iteration 3, or "Initial infrastructure
development."
- A period of time, such as "April," or "Q2-2010."
- A phase of development, such as "Testing" or "Deployment."
- A component of the product, such as "Chapter 12" or "Rear stabilizer."
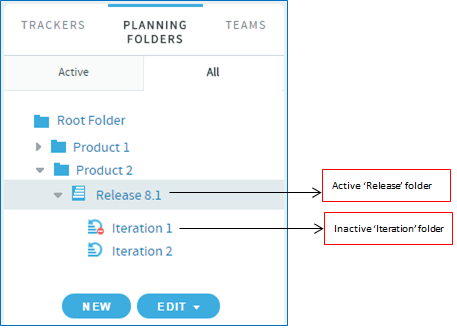
-
Click TRACKERS from the Project
Home menu.
-
Under PLANNING FOLDERS, click the folder in which you
want to create a new planning folder. Click NEW.
An appropriate planning folder creation page is displayed.
-
Select the type of planning folder you want to create:
Release, Iteration or
Folder.
While "Release" and "Iteration" are specific planning folder types, "Folder"
is your standard, generic planning
folder.
Though having multiple planning folder types help you logically organize
your planning folders, there's no hierarchical restrictions on these
different planning folder types. For example, as a user, you have the
liberty to create a "Release" planning folder as a child of an "Iteration"
planning folder, which may not be the ideal use case in an Agile
project.
-
Enter a brief and descriptive name for your planning folder.
For example:
- In an agile project, depending on your requirement, you can create two
or more iteration folders called "Iteration 1", "Iteration 2" and so on
within the Release planning folder.
- In a phased, waterfall-style project, you might name your first planning
folder "Design," the next "Build," and so on.
Tip: Don't worry if you don't have anything of interest to put into
your planning folders yet. The parallel process of filling out the feature
tree will provide plenty of material for this.
Note: This field is mandatory.
-
Use the DESCRIPTION to briefly signal the kind of work
that will be contained in this planning folder.
Include enough information to help people get up to speed quickly when they
join your project. But save most of the detail for the individual tracker
artifacts, where project members will spend most of their time.
-
For STATUS, (available since TeamForge 5.4), select a
value that communicates where the planning folder is in its life cycle.
For a new planning folder, you'll probably want to select Not
started.
Tip: You can create more
values to choose from in your Project Settings.
-
If you have set up a file release in the File Releases tool to deliver the work
you are tracking here, you can identify it in the FILE
RELEASE field (available since TeamForge 5.4).
Any artifact you add to this planning folder will also
appear in the Planned Tracker Artifacts tab when you look at that file release.
Note: If you are creating an Iteration folder, this field displays the
default file release value set at its parent folder level ("Release" folder)
which you can modify.
-
For CAPACITY, (available since TeamForge 5.4), provide a
number that expresses how much work your team thinks it can do in the period
represented by this planning folder. This field is available only for
"Iteration" and "Folder" types.
Tip: When you create a new planning folder, it can be a good idea to
set its capacity to zero until you get a feel for the artifacts and
resources you are working with.
-
For POINTS CAPACITY, (available since TeamForge 7.1), provide a number that
represents the amount of work (expressed as number of story points) that you
think can be handled in that specific planning folder. This field is available
only for "Release" and "Folder" types.
Note: To assist project managers gauge the planning folder's points capacity,
when a release or standard planning folder is selected in one of the
planning board swim lanes, this
information is displayed as a ratio of planned number of story points versus
the actual number of story points. This information does not apply to
Iteration folders and therefore does not appear on the planning board
swimlanes when you select an Iteration planning folder. For more
information, see
Use the Planning Board.
-
Select or enter a start and end date for the work that this planning folder
will contain.
You can change these dates at any time. However, it's important to specify dates
even if they're not firm, because useful visual aids and reports depend on them.
Note:
- The start and end dates of the child planning folder should be
within that of its parent folder.
- These dates are mandatory for an "Iteration" planning folder because
the burndown chart for Iteration planning folders is enabled only
when you specify the start and end dates of an Iteration planning
folder. Also, these dates are not mandatory for a Release planning
folder because the burndown chart of a Release planning folder takes
into account the start and end dates of its child planning folders
(Iterations) and not its own.
-
Select the unit that is suitable for the planning folder from the
DISPLAY EFFORT IN field. Eg. if the planning folder
represents a sprint, then select the unit as Hours and if
it represents a collection of sprints, then select the unit as
Points.
Note: Units are configured at the project level and not at the planning folder
level.
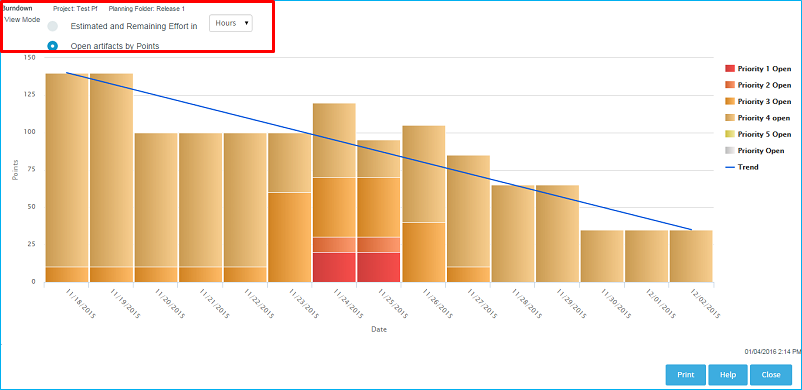
-
Select either Effort or Points
from the BURNDOWN VIEW BY drop-down list to set the View
Mode in the burndown charts (in the planning folder List
Artifacts page). This field is available only for "Folder"
type.
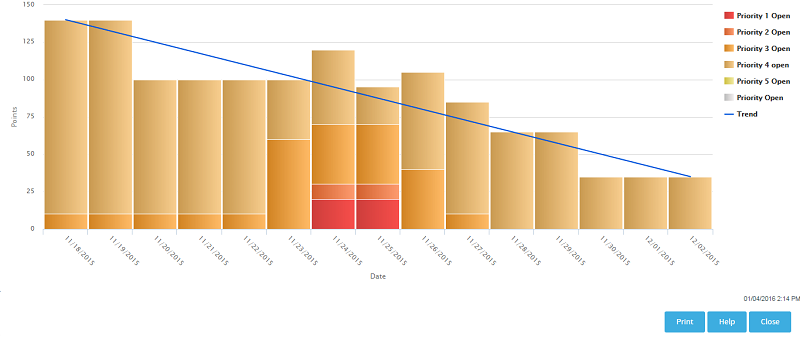
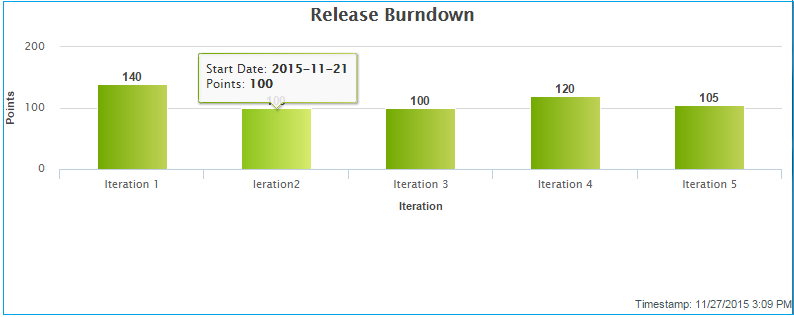
Depending on the planning folder type, the burndown chart is displayed.
- Burndown chart for the standard planning folder type which includes the
View Mode:
- Burndown chart for "Iteration" planning folder type:
- Iteration-wise burndown chart for a "Release" planning folder type:
-
Click Create. The planning folder is created.